by zan@zeliciousrecipes.com | Fish, Sauces, TOP Five
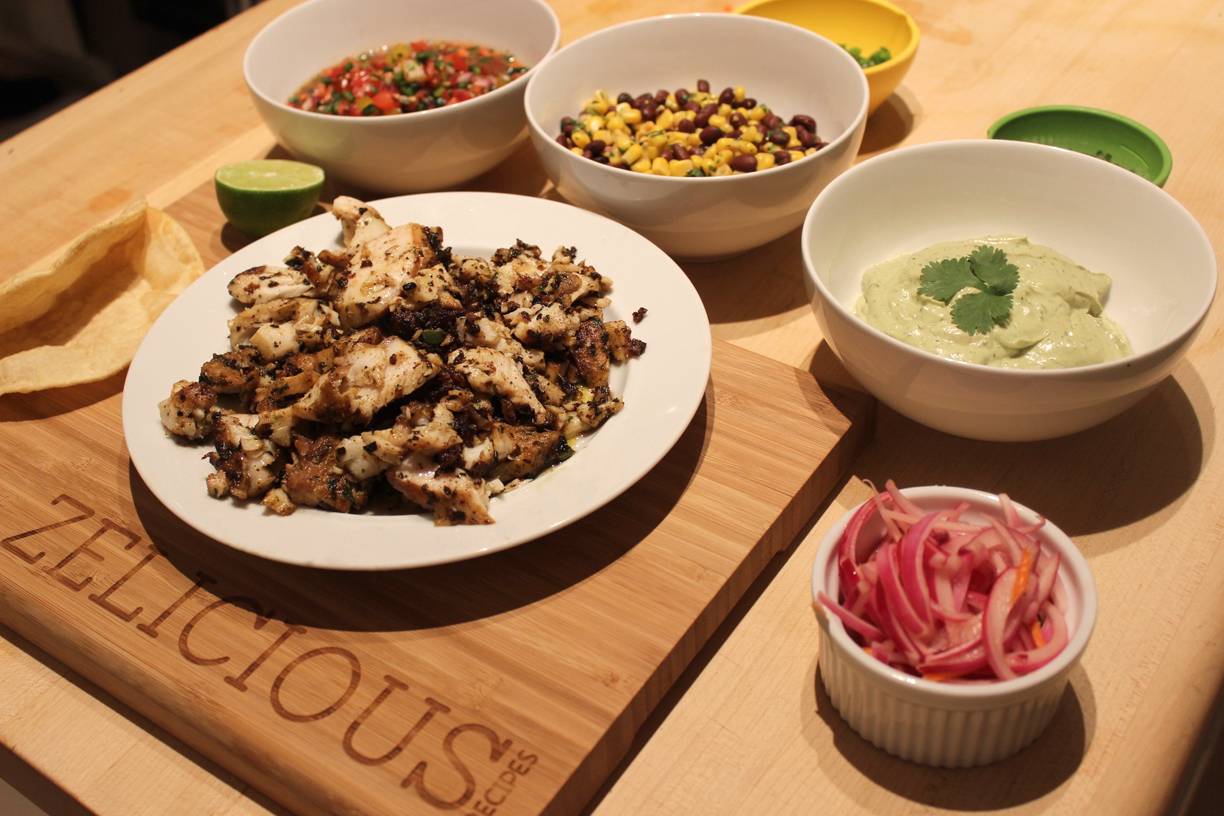
Well, after experimenting with different ways to use Open Blue’s Cobia (aka Black Kingfish), I decided to create a new fish taco recipe. After spending 10 days in Mexico with my family, I really felt like I had tasted ample local flavor, in order to attempt to create something that my family would be proud of… and the verdict was… “This is, by far, the best fish tacos I have EVER had”, a direct quote from my foodie (a try food snob) 16 year old son! Wahoo!!! It truly warmed my heart. Well, so here is goes:
Cobia Marinade*:
- 1/4 cup olive oil
- 1 1/2 teaspoons ancho chile powder
- 1/2 teaspoon ground cumin
- 1/4 cup lightly packed fresh cilantro leaves, chopped, plus more for garnish
- 1 pound of Cobia (black kingfish) cut into 4 pieces
- Salt
- 2 limes cut into quarters
Pickled Onions:
- 1/2 red onion, thinly sliced
- About 1 1/2 cups red wine vinegar
Tacos shells:
- 8 fresh corn tortillas (We love the brand Mariposa)
- 2 cups of canola oil
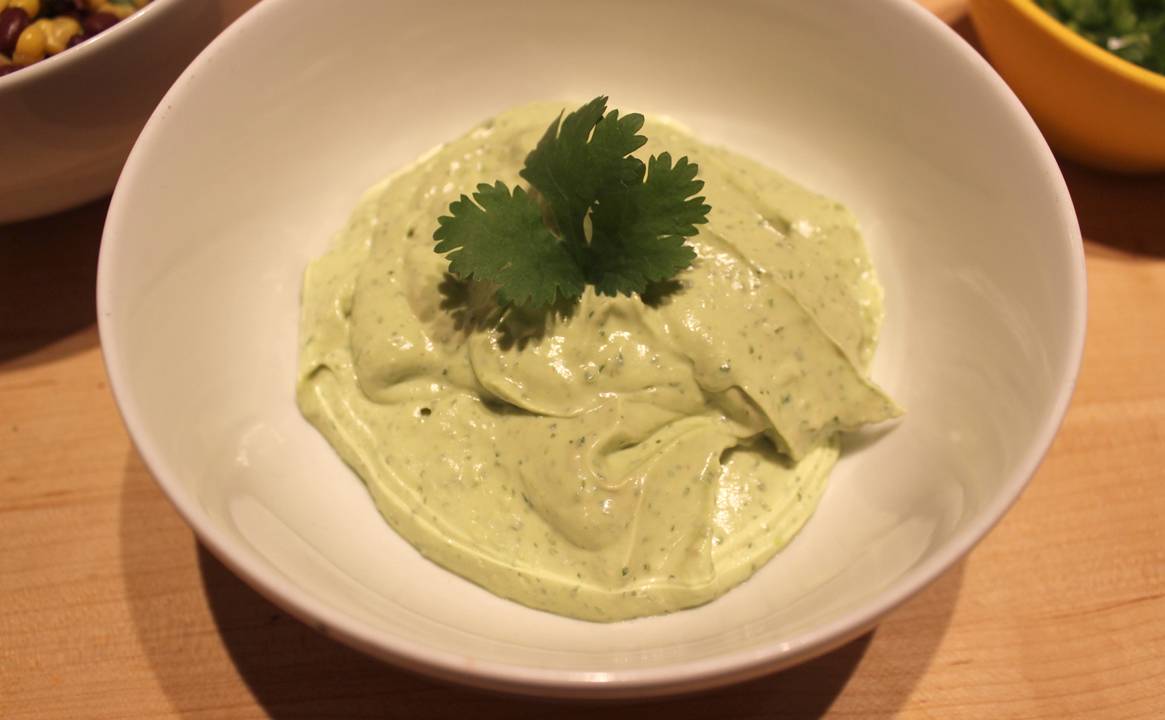
Avocado Crema:
- 2 avocados
- ½ tsp salt
- ¼ cup cilantro leaves
- ½ cup sour cream
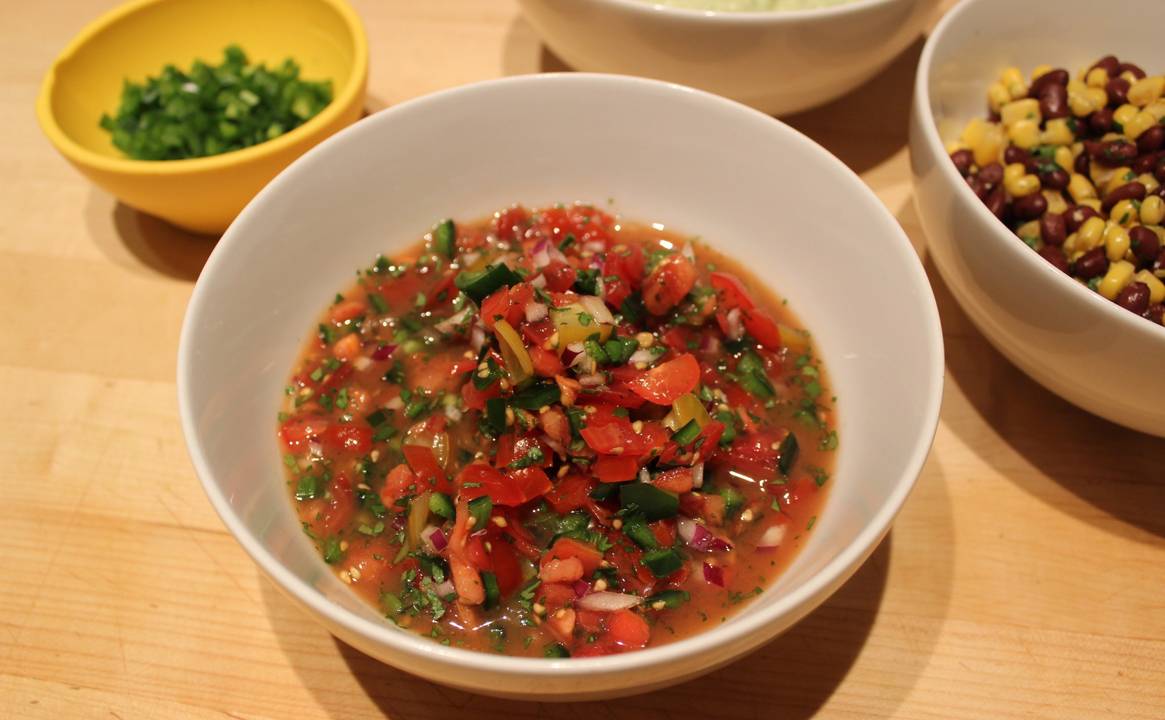
Pico De Gallo:
- 1 ⅓ cup of chopped tomatoes
- 1 chopped green chile
- juice of ½ lime
- ¼ tsp salt
- 1 tbsp chopped cilantro
- 2 tbsp chopped red onion
- 2 tbsp seeded and minced jalapeño (optional)
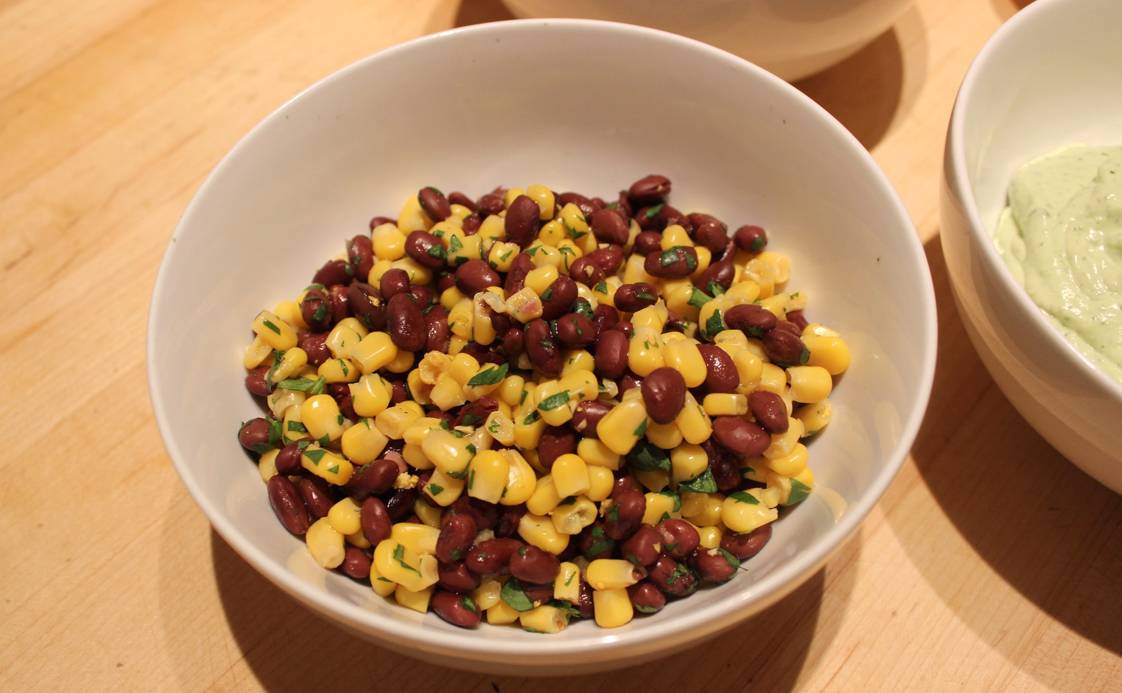
Bean and Corn Salsa:
- 1 cup of sweet corn (organic canned)
- 1 cup black beans (organic)
- juice of ½ lime
- 1 tbsp cilantro
- ¼ tsp salt
Preparation:
Marinate the Onion: Put the onion in a small bowl and pour in enough red wine vinegar to cover well. Set aside for at least 30 minutes or up to several weeks.
Marinate the Fish: Pour the olive oil into a small bowl and add the ancho chile powder, cumin, and chopped cilantro. Mix well. Place the fish in a plastic bag and pour the marinade over it, making sure to massage and coat the fish well on all sides. Allow to marinate for at least 20 minutes. I marinated mine for 2 hours.
Avocado Crema: In a food processor, add the avocados, salt and cilantro. Puree until smooth. Remove from food processor and stir in the sour cream.
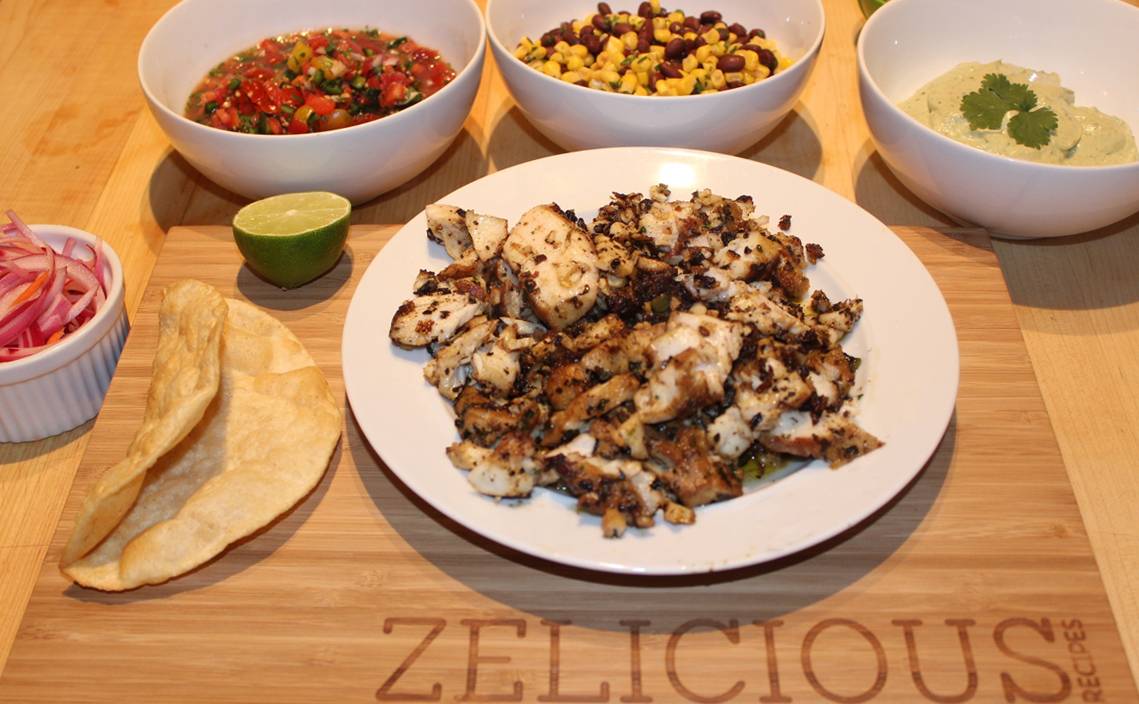
Pico De Gallo/Salsa: For both the Pico De Gallo and the Bean salsa. Mix all of the ingredients together. (I kept them separated).
Cook the Fish: Heat a nonstick sauté pan over medium-high heat. Remove the fish from the marinade and place in the hot pan (there is no need to add more oil). Season the fish with salt. Cook the fish for 4 minutes undisturbed, then turn over, and cook for another 2 minutes or until cooked through and opaque. Remove the pan from the heat and flake the fish into the pan with a fork, making sure to mix in all the marinade that has stuck to the bottom of the pan. Check for seasoning and add more salt if necessary. Set aside.
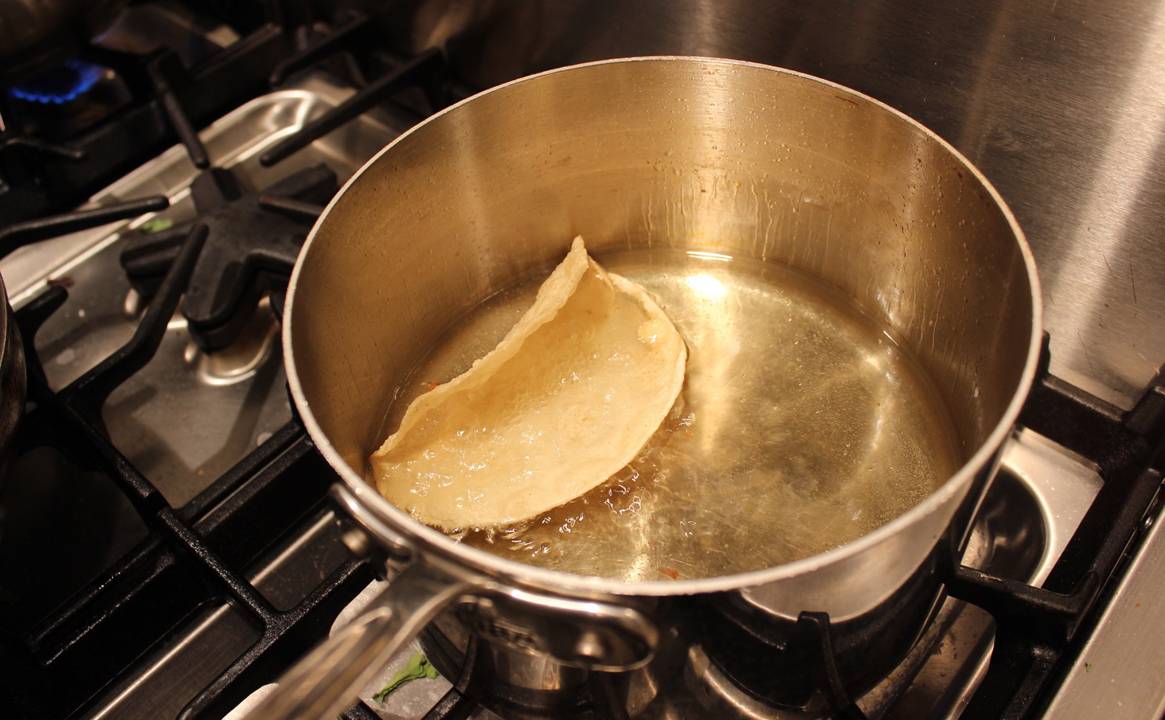 Make the Tortillas Tacos Shells: In a large deep pot, add the oil and cook on medium-high. One by one, place the corn tortillas into the oil, flip over after 10 seconds and make sure both sides start to puff up and brown, crease the middle and bend the tortillas in half, and submerge them until they are crisp. Place them on a paper towel lined plate. Repeat with the remaining tortillas.
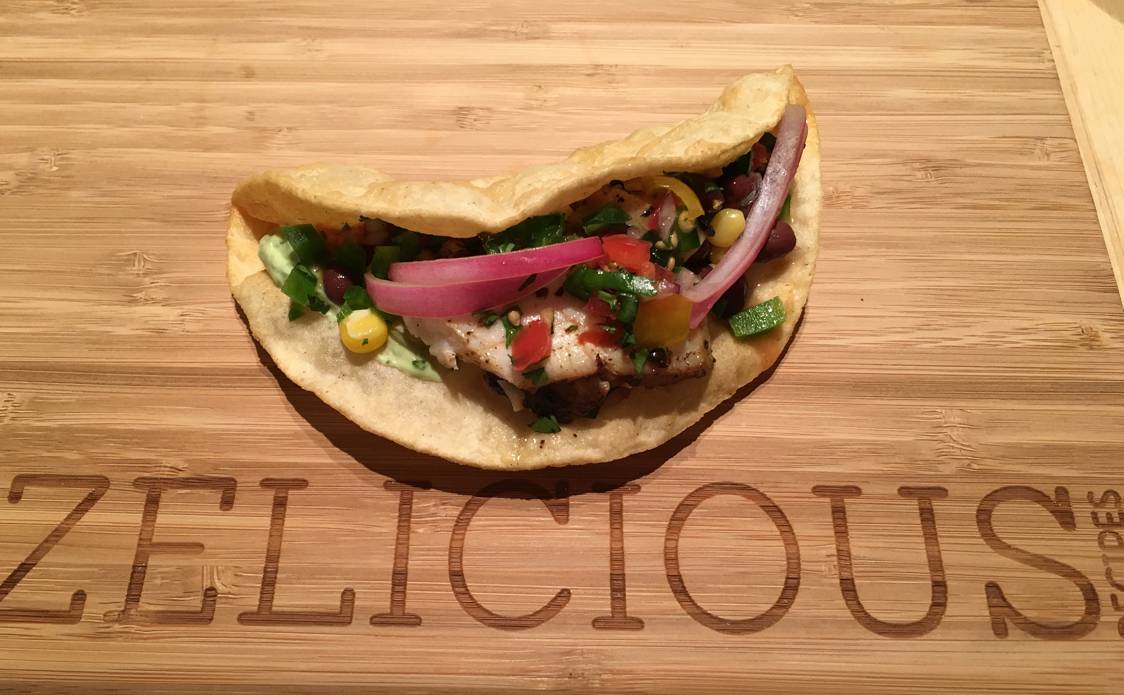
Assemble and Serve: To assemble the tacos, place a heaping spoonful of the marinated flaked fish onto the center of a tortilla, add a squeeze of lime. Top with the both the pico del gallo and the bean salsa, add marinated onions. Serve with a dollop of avocado crema, and cilantro.
*Inspiration from a fish taco marinade I found on Epicurious – made some modifications to the ingredients – the rest of the ingredients below are my creation.

by zan@zeliciousrecipes.com | Favorite Recipes, Pastas
I think I’ve said this before… but we LOVE pasta! This is one of the first homemade raviolis I have attempted to make, using a cool new ravioli stamp, courtesy of my Mother-In-Law. This device came straight from a little shop in northern Italy and was brought back for me to attempt my own homemade ravioli. I found the same tool on Amazon, which was called the Eppicotispai Aluminum Square Ravioli Ejector Stamp with Beechwood Handle. So, if you’re adventurous and daring you can try it yourself.
Ingredients:
For the pasta: 100 grams of flour per 1 egg. (full recipe can be found here) – follow those instructions so you have strips of thin dough. Using setting #7 on your Atlas Pasta maker. You should end up with strips that are at least 3 inches wide. I used 300 grams and 3 eggs which produced 40 ravioli.
For the pasta filling:
- ½ cup fresh grated parmesan cheese (do not pack into measuring utensil) – should be fluffy
- ½ cup shredded mozzarella
- ½ cup ricotta cheese
- 1 tsp truffle oil (I used Urbani White truffle oil)
- ½ tsp salt
Mix all ingredients into a bowl, making sure the truffle oil is well incorporated. You will also need to whip 2 eggs in a separate bowl which will be used to seal the pasta closed.
For the Burnt Butter Sage:
- 1 cup sage (cut into strips)
- 1 stick of butter
- ½ cup of fresh grated parmesan cheese
Before making the pasta dough, be sure to put a large pot of water set to boil, and make sure to add enough salt to the water.

 Directions:
Layout the strips of dough onto a floured surface. Using a basting brush, brush the egg onto the pasta dough strips. Scoop 1 tsp. of the cheese-truffle mixture, spacing them onto the top portion of the pasta, and about 2 ½” apart. Fold up the bottom part of the strip to cover the cheese filling, making sure to push out all of the air around the cheese. You want to ensure they don’t fill with air. Once it is sealed over the cheese you now get you handy-dandy Eppicotispai Aluminum Square Ravioli Ejector Stamp and stamp over each portion of cheese filling. I had to wiggle it around on the cutting board, to ensure the edges were cut. Please be careful as the edges of the stamp are very sharp.

 You should end up with a row of ravioli just like this. After you repeat the process with all of the strips of pasta dough you can line the ravioli onto floured wax paper.
You can now make the burnt butter sage sauce. Melt the butter on medium heat. Add in the sage and cook for 10 minutes or until the sage is crispy and the butter slightly browned. You now can cook the pasta. Approximately 5 minutes, but be sure to test them as they cook, you don’t want them over cooked, just al dente. Drain the pasts with a slotted spoon, making sure all the water is drained well, (otherwise the butter sauce gets watered down). Place a large pinch of parmesan cheese onto the pasta then pour the sauce over the cheese. It will slightly bubble, melting the cheese. I personally like to plate individual portions, but be sure to remove any left over raviolis as they are great reheated in boiling water the next day.
by zan@zeliciousrecipes.com | Favorite Recipes, Pastas
My family loves pasta! Any kind of pasta, but a good homemade pasta is hard to beat! Fortunately I was given the right set of pasta tools! Thanks to my mother-in-law that lives in Italy a majority of the time, and my somewhat Italian husband, I have a great set of pasta tools. First time around, it was a little labor intensive, but once I became more familiar with the Atlas Pasta maker, it became super easy. The ingredients are so straightforward: eggs and flour! That’s it!
Tools needed: Atlas Pasta Maker, kitchen scale (measuring grams), and a fork!


Measure out 100 grams of organic all-purpose flour per 1 egg. I used 400 grams of flour and 4 eggs for this batch.
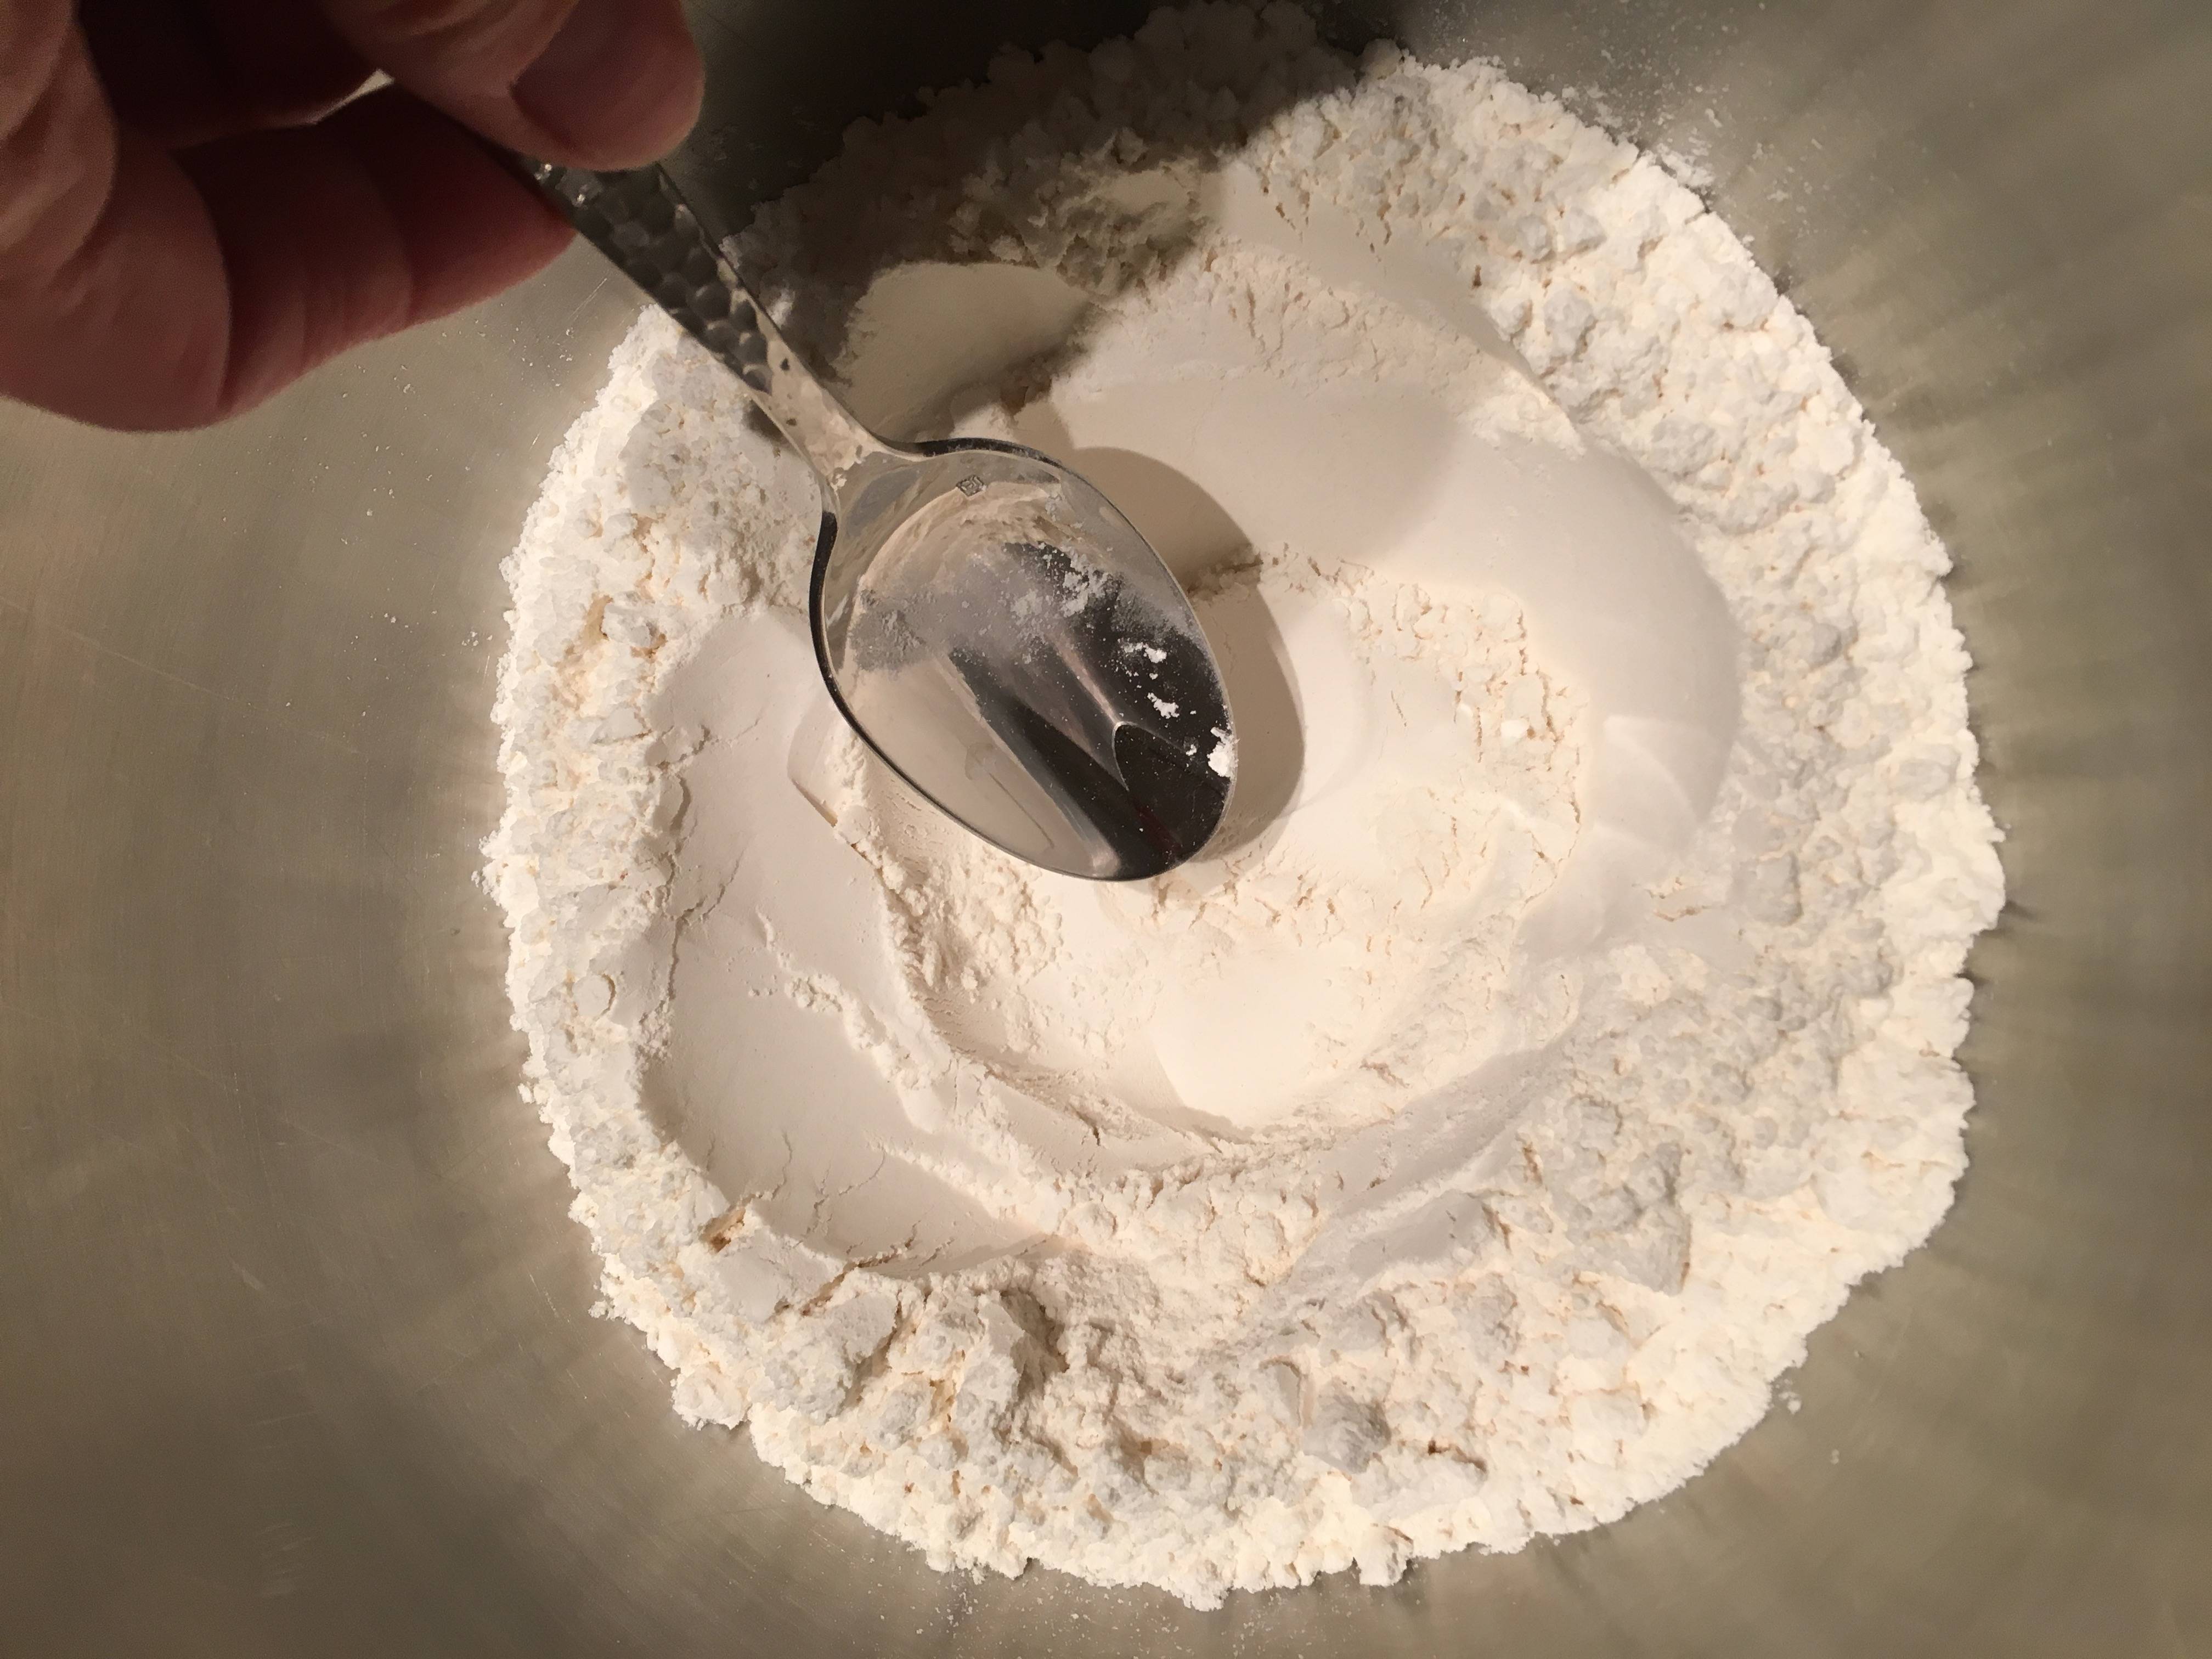
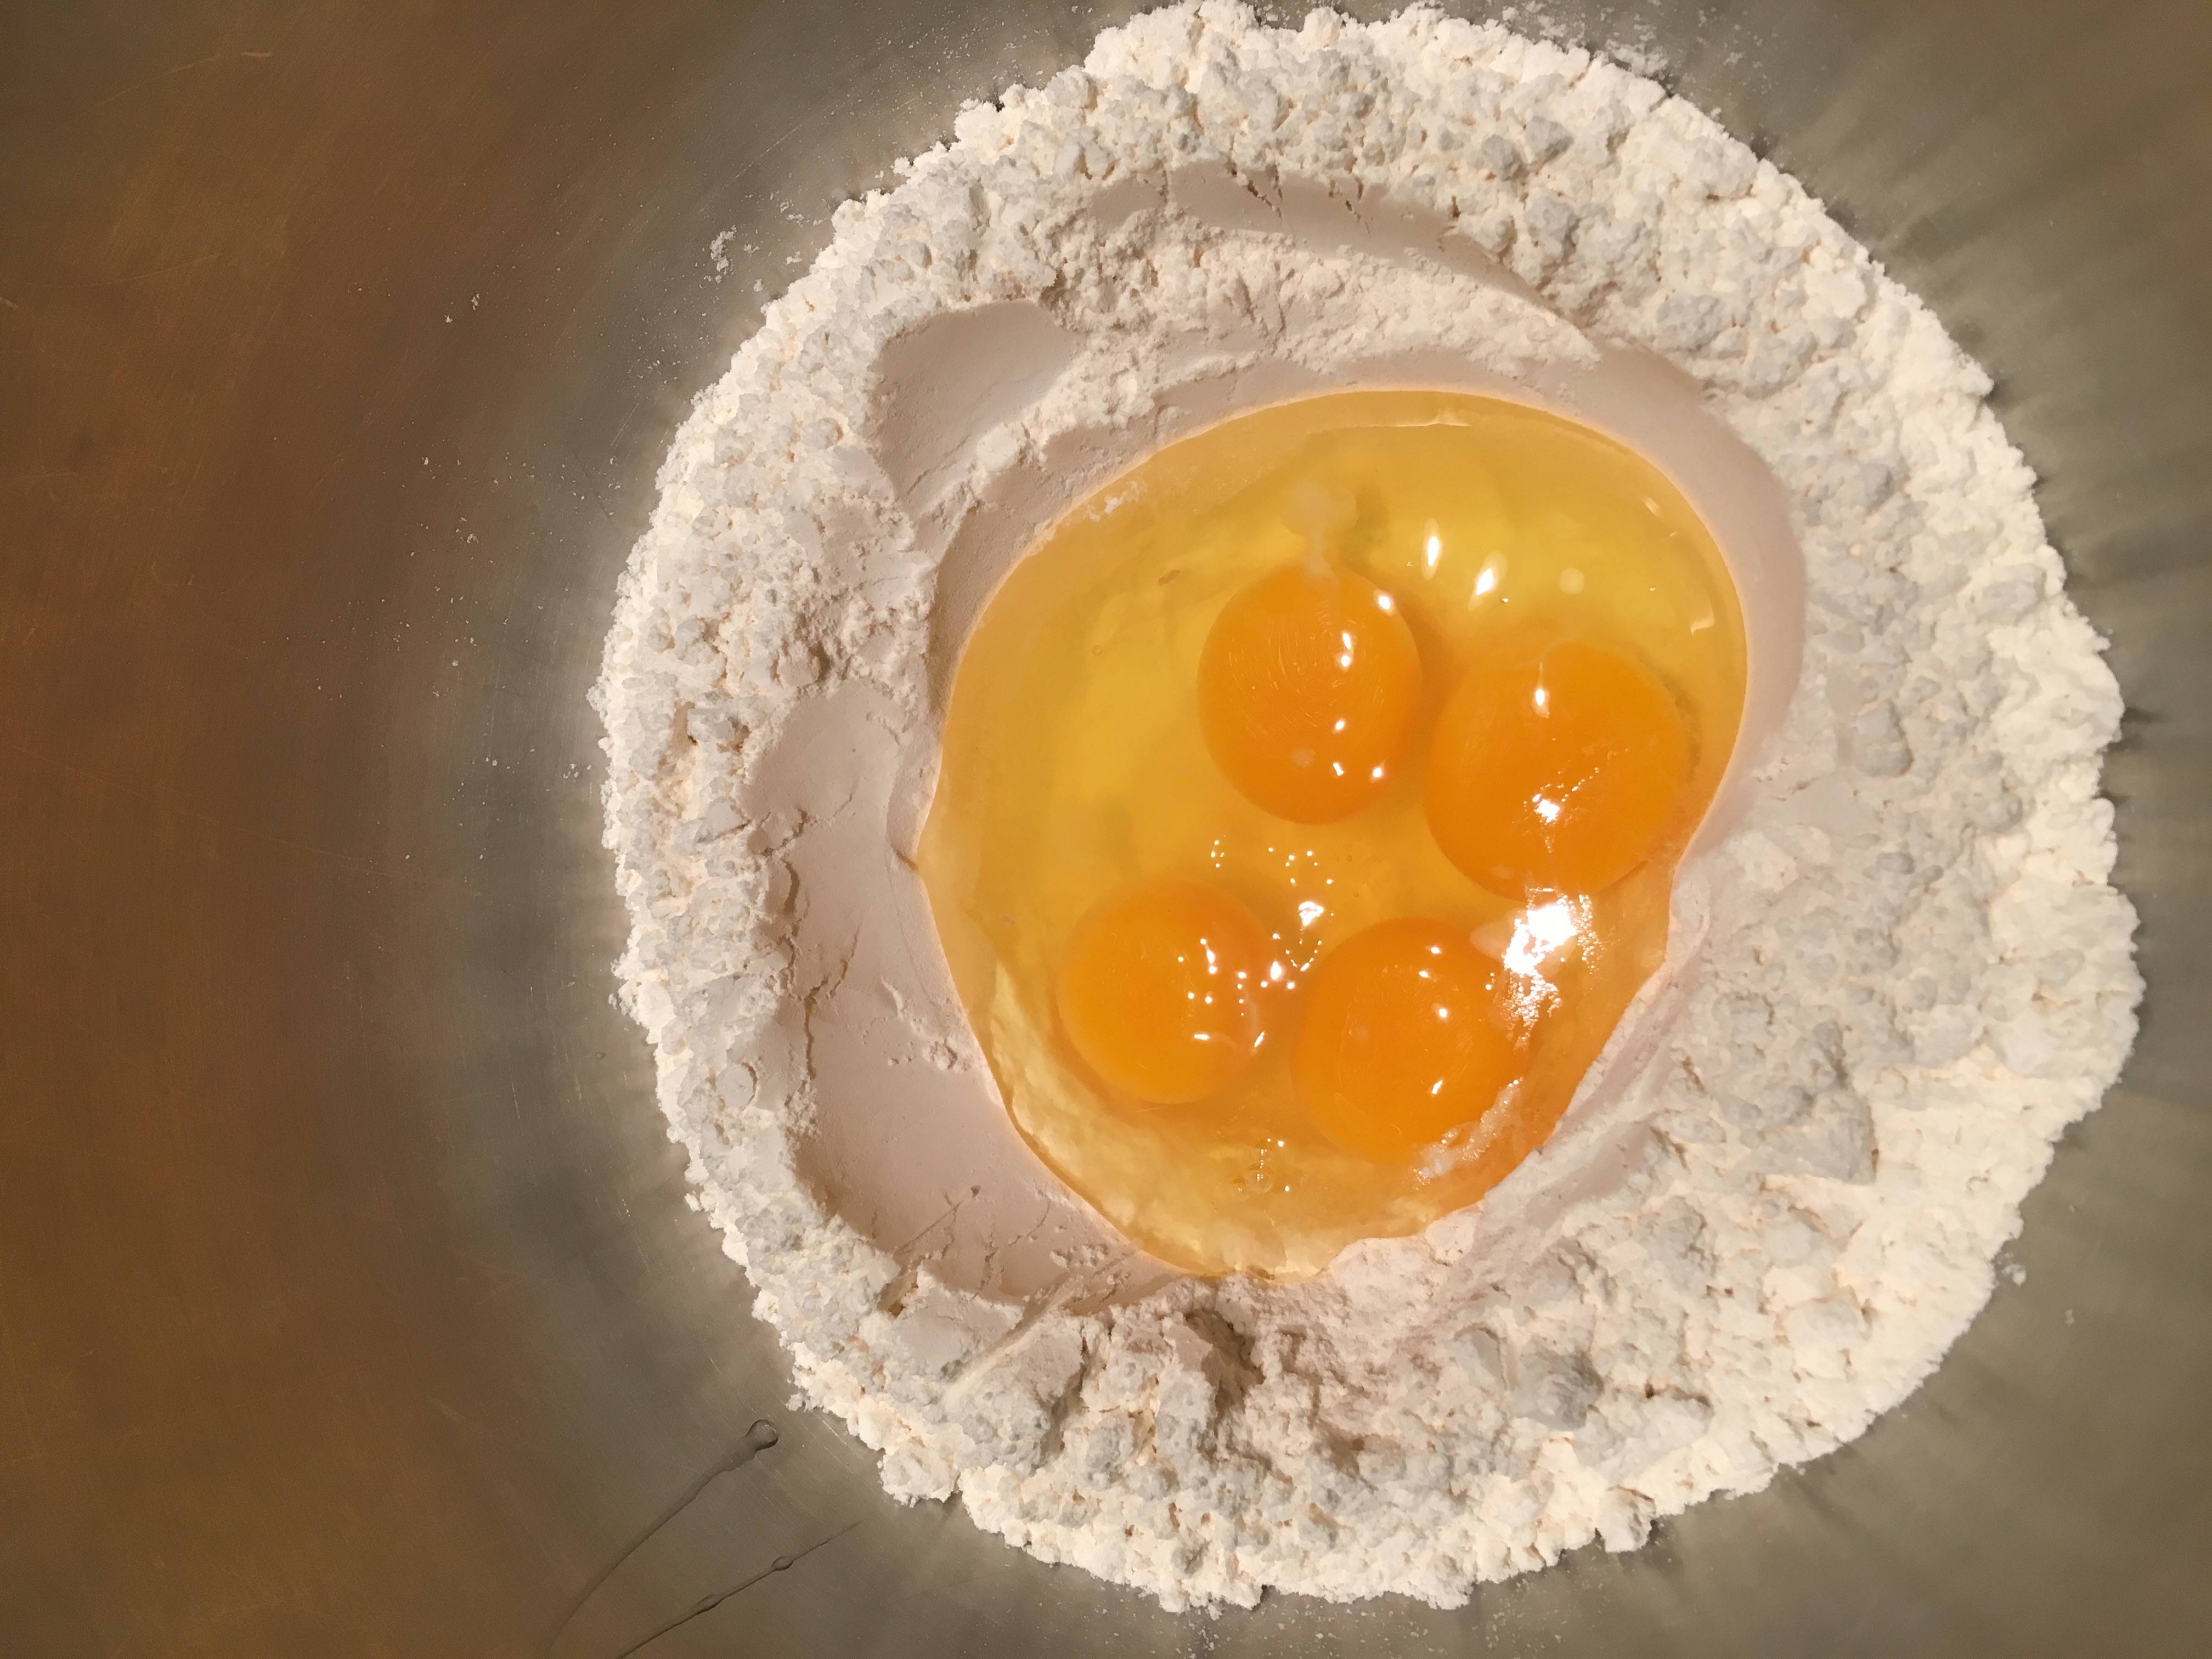

First you measure the flour into a large mixing bowl. Make a crater in the center of the flour, and crack in the eggs. Slowly stir your fork into the center, slowly incorporating more flour from the edges, until the eggs are nicely mixed in. You can then transfer the mixture onto a floured surface, and kneed the dough, until eggs and flour are well incorporated. Next you divide the portions into fourths. Using your Atlas Pasta maker, on setting “zero” (which has the widest space), run the dough through the mixture. On the Atlas, the higher the number on the dial, the thinner the dough. If the dough is too moist it will stick to the surface of the rollers, so add some more flour. If the dough is too dry, it will pass through and crumble out, so add a big of water and kneed the dough again. I run the dough through several times, adjust the width, so that I end up at the fifth (5) setting for pasta, or seventh (7) setting for fettuccini.

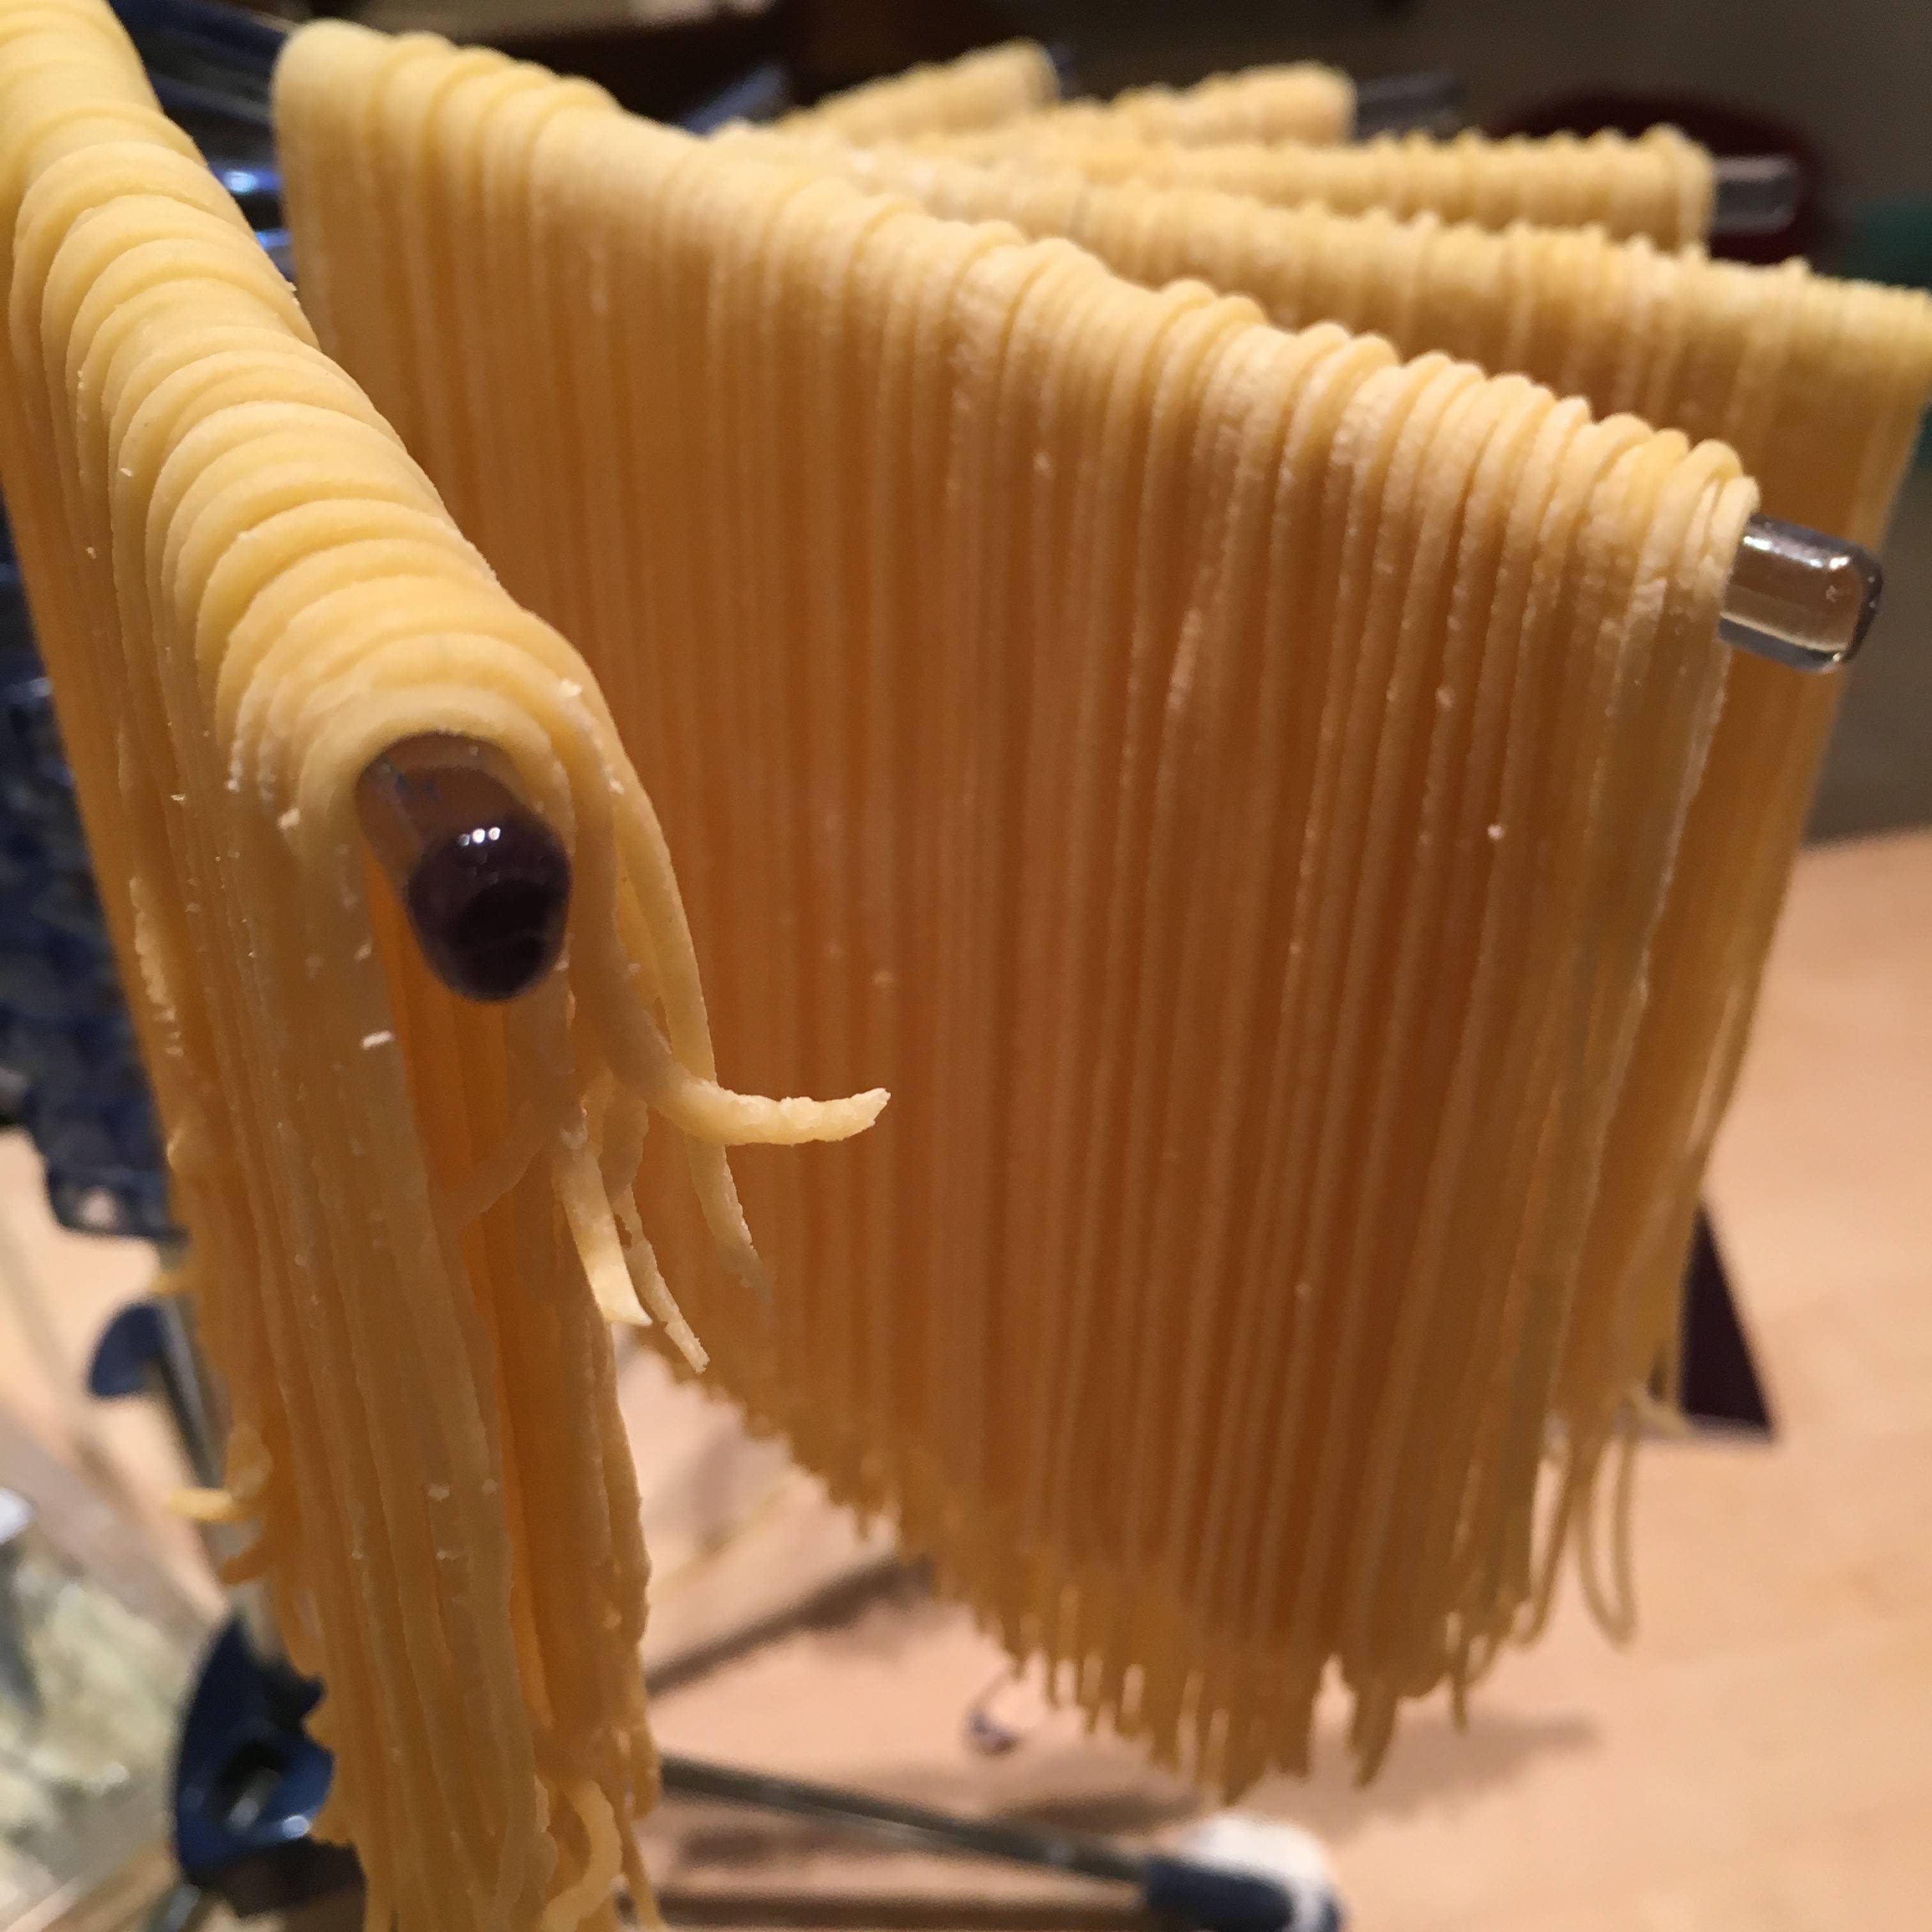
 Once you have 6 strips of thin pasta dough, you can now add on the spaghetti/fettuccini attachment, and run the dough through the spaghetti roller. I also purchased the Atlas Drying rack in order to hang the pasta, until you are ready to cook.
Meanwhile put a hit pot of water on to boil, and be sure to add enough salt, since the dough is not salted. Cook the pasta for approximately 4-5 minutes. I’m at altitude so it takes a bit longer to cook, so it might cook a bit quicker. Be sure to only cook it al dente.
Add your favorite spaghetti sauce and serve! Must be eaten immediately.

by zan@zeliciousrecipes.com | Meats, Restaurants
I love lamb and especially a crown roast. They are like lamb popsicles. A crown roast can be created by taking two 7-rib racks of lamb and tying them together (or ask your butcher to prepare for you). It’s a great easy meat to serve a small group of people (5-6 adults). It goes nicely with rosemary & garlic or parsley & mint. I like to marinate the lamb for at least 6 hours before cooking. I have made this roast several times, pairing it with Flageolet beans, seared greens and garlic mashed potatoes, as well as with (see below) roasted rosemary new potatoes with Chive Creme Fraiche sauce.
INGREDIENTS
- 1/4 cup chopped fresh rosemary
- 12 garlic cloves, minced
- 1 tablespoon salt
- 2 teaspoons ground black pepper
- 1 crown roasts of lamb, consisting of 14 chops
- ¾ cup Olive oil
PREPARATION
Mix chopped rosemary, minced garlic, salt and black pepper in small bowl. Add in the olive oil to the mix. Place crown roasts of lamb, spaced apart, in a large plastic bag and add half of the mixture. Making sure all section of the lamb are covered. Store in refrigerator to marinate for 6 hours. Preheat oven to 450°F. Remove lamb and brush with remaining era/olive oil mixture. Cover bones loosely with sheet of foil. Roast lamb until instant-read thermometer inserted into thickest part of lamb registers 125°F to 130°F for rare, about 20 minutes (or 130°F to 135°F for medium-rare, about 30 minutes; or 135°F to 140°F for medium, about 35 minutes).
Transfer lamb to platter; let stand 5 to 10 minutes. Remove foil and string. Cut lamb between ribs into chops and serve.
This one I served with roasted rosemary new potatoes. I made a chive-Crème fraîche sauce for the potatoes which ended up going pairing really well the lamb.


by zan@zeliciousrecipes.com | Meats, Sandwiches, TOP Five
So I finally purchased my first Panini press, and it has transformed my world of sandwiches! My son returned from his month away at camp and asked me to make him lunch… so out came the press that we have both wanted forever, The Brevile Panini Duo! This creation of came together with the help of the balsamic reduction I made for my Buffalo burger.
Ingredients:
- 2 pieces of white sandwich bread
- 8 thin slices of Bresaola
- 4 slices of manchego cheese
- 4 slices of gouda
- ½ cup of baby arugula
- 1 tsp. balsamic reduction + ⅓ cup for dipping
- 1 fried egg
Directions:
Be sure to butter your bread on the outside so it gets a nice crispy and moist exterior. Place the cheese closest to the bread one type on either side, and layer the arugula and bresaola on top of the cheese. Drizzle the 1 tsp. of the balsamic reduction. Merge the 2 halves and place on the panini press. Close the lid and slide the setting to toast. Meanwhile fry one egg in a non-stick skillet. Cook so whites are fully cooked, but the yolk is still runny.
Remove the melted sandwich after 4 minutes and cut in half. Place egg on top, and serve with the side of balsamic reduction.


by zan@zeliciousrecipes.com | Meats, Sauces, TOP Five
Buffalo Burger with Balsamic reduction and fried egg
I can honestly say I think my son should be a food critic. My 16 year old, came up with this masterpiece and it’s probably one of THE best burgers I have ever tasted. It has the peppery taste from the Arugula, the sweet from the balsamic reduction, the fruity and nutty taste of parmesan, and then… there’s the fried egg! Seriously?
Make Balsamic reduction – Cook 1 cup of good quality balsamic vinegar + 1 tbsp sugar on medium-high heat. Once boiling, reduce to simmer (low heat with small bubbles along the edges) and let simmer for about 10 minutes until vinegar has reduced down. Stir occasionally. It should be able to stick to a spoon, with it’s thick consistency. Let reduction cool and serve. Save the remaining sauce in a Tupperware and store in refrigerator. If reduction hardens after being in refrigerator for too long just place container in a bowl filled with warm water to soften it up.
INGREDIENTS (per serving)
- 6-8 oz ground buffalo meat
- ½ tsp Worcestershire
- salt and pepper to taste
- 6-8 leaves of arugula
- 6-8 slices of parmesan
- 1 fried egg
- 1 brioche bun
- 1 tbsp of softened butter
DIRECTIONS
Turn on your grill or grill pan on high. Make the buffalo patty by gently working in the Worcestershire, salt and pepper to the buffalo meat. (Do not compress, or smack the buffalo patty). Make the center of the patty thinner than the edges, and place on the grill. Cook the buffalo until the internal temperature is 130 degrees. Remove and let sit. Meanwhile, add your egg to an small non-stick skillet and cover. Flip over without breaking the yolk, and be sure to not overcook, as you want the egg yolk still runny. Remove from heat. Add the butter to all side of the brioche bun and grill for 10 seconds on each side. Assemble the burger onto the bun, adding the patty, the egg, arugula, parmesan cheese, and finally drizzle on the balsamic reduction onto the burger and the top half of the bun. My husband actually had a dish of the reduction to dip in the burger into. Enjoy!